Showing posts with label free recipes. Show all posts

Monday, March 2, 2015

Delicious Healthy Gluten Free, Peanut Butter Chocolate Chip Cookies!

I have a total sweet tooth and I love to bake, so I'm always looking for healthier alternatives.  I play with lots of different options including both vegan and gluten free.  Not only do I like to play with new recipes, but I also like to be able to offer my clients different options to suit their needs and style of eating.

I'm really bad with recipes because I tend to cook a lot from taste, heart and spur of the moment improvising.  So when people say, "That was amazing, can you make it again?"  My answer is usually, "Yes but most likely it will taste different."  Baking is a little different because it requires more precise measurements.  Recipes I try end up in 3 different categories:  1) I won't be making that again! 2) This was pretty good!  I'm gonna keep it with my other recipes (sometimes they get made again but most of the time not) and 3) Wow this is awesome I've gotta share it and I'll definitely be making this again!

Here are some category 3 cookies!  These can be gluten free and also have no butter or oil either. 

Try these awesome Healthier Peanut Butter Chocolate Chip Cookies

Ingredients
  • 1 cup creamy peanut butter* ( I use the kind you blend yourself at the store)
  • 2 tablespoons honey
  • 4 tablespoons light brown sugar, lightly packed
  • 1/2 cup + 2 tablespoons old-fashioned oats (I use gluten free oats to make them gluten free)
  • 1/8 teaspoon salt
  • 1 teaspoon baking soda
  • 1/2 teaspoon vanilla extract
  • 1 large egg
  • 1/2 cup peanut butter chips + chocolate chips (I use all organic dark chocolate chips)
Instructions
  1. Preheat the oven to 350 degrees F. (My oven tends to run cooler so I bumped it up to 375)
  2. In a medium sized bowl stir together the peanut butter, honey, and brown sugar. Do NOT warm up the peanut butter or the honey.
  3. Add in the oats, salt, baking soda, and vanilla extract. Stir well.
  4. In a separate bowl lightly beat the egg and then add it to the mixture.
  5. Stir in desired add-ins (I used a peanut butter and chocolate chip mixture), but you can use dark chocolate chips, raisins, craisins, peanuts, etc. to make these even healthier and more breakfast worthy.
  6. The mixture will be thick and hard to stir. Continue stirring until combined and then use a cookie scoop to scoop out the dough. Press the dough very tightly in the cookie scoop to form the balls. Without a cookie scoop these tend to crumble.
  7. If not using a cookie scoop you will have to work with the dough a little bit more by squeezing it into a ball.
  8. Form the balls onto a cookie sheet and bake for 7-9 minutes. (Again my oven runs cooler so I had to add time to these.  I added 3 mins at a time and kept checking them)  Took them off when bottoms were browned.
  9. Remove and allow to cool completely.


Enjoy! 


Saturday, January 3, 2015

Which is better? Kale vs Spinach

I often get asked by my clients, "Which do you feel is better - spinach or kale? 


Both greens are bursting with vitamins, minerals and antioxidants!  Leafy organic greens, are among the most nutrient dense veggies you can go for.  Even though Kale is winning the super food popularity contest right now, spinach is actually a more concentrated source of nutrients, nutritionists say.


Kale contains 10% of your daily needs for 7 different nutrients, whereas spinach packs 10% of your daily requirements for an impressive 18 vitamins and minerals, including energy- boosting iron, bone enriching calcium and folate, a key vitamin for women of child bearing age.  Plus, with 5 grams of protein in spinach versus 2 in kale, so you'll feel fuller longer.
Spinach Recipe
I really like my spinach with an Asian flare!  Here is a simple spinach recipe!

*Bring your water to a soft boil
* Put in spinach and just blanch it (you will see it start to wilt and turn bright green).  This should only take 1-2 mins or so. 
* Remove and put in ice bath to stop cooking
* If you have a salad spinner use it and get as much moisture out of the spinach as you can.  If you do not have one, you will need to do this by hand.  You can use paper towel.
* When it's as dry as you can get it, toss it with sesame oil and season with salt and pepper (I also use toasted onion granules and garlic granules)
* Add raw garlic to taste (1-3 cloves)


Sunday, December 7, 2014

Pamer yourself at home with this natural face mask

Natural beauty tip time!  Who doesn't like healthy, glowing skin?  Did you know that the very best items for our skin, can be found in our homes?  You really don't have to spend money on high end products.  You can save some money and cut out all of the artificial ingredients!

Last night I wanted to pamper myself with a healthy face mask!  My skin can sometimes lean towards the oily side and around my cycle, breakouts are no uncommon.  Last night I wanted to do a mask that would hydrate, address acne and tighten all at the same time.  I have to say, it made my face feel really clean and soft!  I could feel it tingling and tightening. 

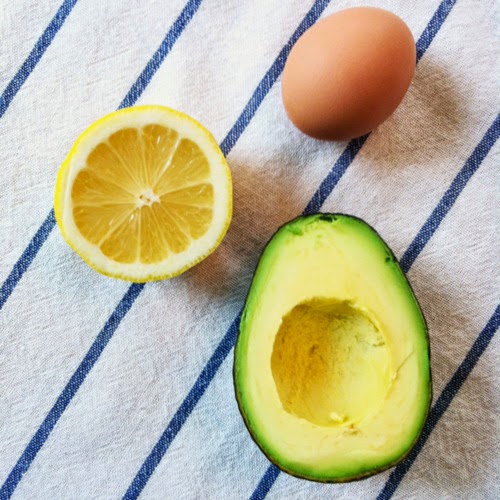
Try this Avocado Egg White Mask the next time you want to pamper yourself all natural style!

Ingredients

  • 1 ripe avocado pitted, peeled and mashed*
  • 1 egg white
  • 1 tsp lemon juice


Directions

  1. In a small bowl, combine mashed avocado with egg white and lemon juice. Mix with a wooden spoon to make a smooth paste.
  2. After cleansing, apply face mask onto entire face except eye area for 20 minutes. Rinse and follow up your usual beauty routine (such as toner and moisturizer). The mask do not keep well and it is recommended to use it within a day.
(This mask is quite messy, so it is advisable to lie in bed and relax for 20 minutes while putting it on. It will be even better if you can ask someone to help you to apply the mask while you are lying down!)


Saturday, December 6, 2014

One Pan Mexican Quinoa Recipe

Healthy, easy recipe alert! I love trying new recipes and I do my best to try at least one new recipe per week.  Sometimes they come together and I love them and other times I don't.  That's what cooking is all about though!  Get in the kitchen, experiment and have fun!  Try new things and expand your horizons. 

Here is a new recipe I tried tonight that I will definitely keep in the rotation.  It's really easy too so you could easily do this after working a long day.  This recipe would make great leftovers too.

One Pan Mexican Quinoa
Prep Time 10 minutes
Cook Time 25 minutes
Total Time 35 minutes
Yield 4 servings
 
What you will need ...

 
Ingredients
  • 1 tablespoon olive oil
  • 2 cloves garlic, minced
  • 1 jalapenos, minced (if you like some heat)
  • 1 cup quinoa (raw)
  • 1 cup vegetable or chicken broth
  • 1 (15-ounce) can black beans, drained and rinsed
  • 1 (14.5 oz) can fire-roasted diced tomatoes
  • 1 cup corn kernels
  • 1 teaspoon chili powder
  • 1/2 teaspoon cumin
  • Kosher salt and freshly ground black pepper, to taste
  • 1 avocado, halved, seeded, peeled and diced
  • Juice of 1 lime
  • 2 tablespoons chopped fresh cilantro leaves
 
 
Instructions
  • Heat olive oil in a large skillet over medium high heat. Add garlic and jalapeno, and cook, stirring frequently, until fragrant, about 1 minute.
  • Stir in quinoa, vegetable broth, beans, tomatoes, corn, chili powder and cumin; season with salt and pepper, to taste. Bring to a boil; cover, reduce heat and simmer until quinoa is cooked through, about 20 minutes. Stir in avocado, lime juice and cilantro.
  • Serve immediately.


Enjoy!


Thursday, December 4, 2014

What do you want from the new year?


The new year is right around the corner!  Have you thought about what you would like to accomplish in 2015?  Now is a great time to start!
I will be starting to starting a list to keep track of who wants to enroll in our New Year Now You group.  This is going to be an amazing place to kick off the new year on the right foot!  In this group you can expect to receive:
* Support in setting your goals for the year
* Assistance in implementing a health plan
*  Education on nutrition
* Exposure to tools that will help you find balance mind ~ body ~ spirit
*  Support, motivation and inspiration


We will also be kicking off the group with an optional 3 Day Refresh Cleanse to really optimize our results!  It's a super awesome way to drop a few excess pounds, gain energy, kick your cravings, eliminate toxins, revitalize you organs and give you a boost to start your your health journey. 


This group will fill up fast so please message me if you would like to be added to list!  Please feel free to ask me any questions you may have as well.  Please email me at heatherchristine312@gmail.com and request to be added to the list.

Make  2015 your best year yet!!!

Tuesday, November 18, 2014

Homemade Chicken Stock Recipe

I have to tell you, I'm really not one to toot my own horn but today I'm tooting away :)  I did it .... I finally made my own chicken stock!!  For those of you who have been making your own you're probably thinking, "ummm what's so hard about that?!"  The answer is .... absolutely nothing, yet I still kept screwing it up.  This time I got the low down on what not to do and it turns out I was doing all of them and my stock was cloudy!! 

So here are the top 5 things not to do, if you want clear stock!
1.  Always start with cold water
2.  Do not cover the pot
3.  Do not stir the stock
4.  Do not boil the stock
5.  Do not salt the stock

Nothing beats homemade chicken stock and once you're following good instructions, it's super easy!  Store bought chicken stock is full of sodium and other artificial ingredients.  Not to mention, most of the time it comes in cans with chemicals in the liners.  Making it at home is a great way to avoid these unwanted ingredients and it just tastes better!

Homemade Chicken Stock Recipe (Makes right around 3 quarts - give or take)
What you will need:
* 10 quart sauce pot
* Chicken carcass and parts if you have them ( I used the carcass from my Costco rotisserie chicken)
* 2 large yellow onions
* 4 Carrots, peeled
* 3 ribs of celery (leaves and all)
* 1 bouquet garni (thyme, parsley, bay leaf)
* 8 black peppercorns


Instructions:
* Put your chicken parts in your stock pot and cover with water.  Add a few extra cups because some of the liquid will evaporate. Place on high heat and bring to a boil.  Once it has boiled turn down to a simmer and with a ladle or a spoon skim off the scum and chicken fat that has risen to the top. 
* While you are waiting for the water and chicken to come to a boil, rough chop the onions, carrots, and celery (leave them big and chunky).


* Place all the rough chopped vegetables in with the chicken and water.
* Next add the bouquet garni:  3 fresh sprigs fresh thyme, 8 sprigs and stems fresh parsley and one dried bay leaf (you can tie together or let float).
* Add 8 black peppercorns; bruise peppercorns with flat side of your chefs knife.


* After stock has simmered for a minimum of 8 hours and up to 24 (you want it to be nice and rich), turn off the heat.  (If you don't want to leave it on overnight, you can put in the fridge at the end of the first day and start again in the AM.  You are only on a simmer though so I just left it on all night).
* Put a strainer over a big pot and strain out all of the big pieces first, discard the chicken and veggies.  Then cover your strainer with cheese clothe, or paper towel and strain a few more times to get out the smaller particles (if using paper towel change).
* Chill the stock uncovered in an ice bath or in a refrigerator, until the fat congeals on the surface.  Scrape off with a spatula or spoon.
 
When the stock is cooled portion into 1 quart containers, date, label and freeze for future use. 


Monday, November 17, 2014

Feeling Like It's Time For A Health Jump Start!

I Know many people think that because I'm a Healthy Lifestyle Coach, living healthy must always be easy for me.  I know this is going to come as a HUGE surprise for you but ..... I'm human!  I know, I know shocker!  In fact, I became a Healthy Lifestyle Coach specifically to keep myself on track with my own goals.  The support, motivation and inspiration I'm surrounded by everyday, is just electric.  It makes me not only want to be my best, but help others be their best as well!

So back to that being human part ... I've been struggling with my nutrition lately.  After getting the news that I'm a match and will be donating my liver in January, I have been indulging more than usual.  Let's call it what it is, I've been stress and comfort eating!  I can feel my sugar cravings are up and I'm just not as comfortable in my clothes (which is my biggest gauge). 


There would have been a time when I would have really been beating myself up about being off track, gaining a few pounds and being unable to get back on a good routine but not anymore.  I learned that when I did that, I ended up eating way more and it lasted for longer periods of time.  Not to mention, when you are stressed out and/or anxious, your body will automatically hold onto belly fat - so look at all the harm you are really doing!  Through my personal development I have learned to be patient and gentle with myself.  I allow myself some flexibility because life requires that, wouldn't you say!?  I understand that this is part of a process I'm going through and know that I will get back to my great nutrition habits!  It feels so much better and causes way less damage in the long run :)  Here is a tip I leaned and implemented into my life.  When you are talking to yourself about a certain situation and feel you're coming down hard on yourself, ask yourself this question, "Is this the advice I would give a good friend?"  Wow what an eye opener!!  Some of the things I was saying to myself I would NEVER say to a friend I cared about.  I really had to learn how to love and respect myself and now I have gotten so much better with positive self talk.

It's time for my go to when I need to get back in line.  I use this every time I'm feeling my sugar cravings are up and my clothes are not fitting the way they are supposed too!  It's 3 Day Refresh time!  No better time then after Thanksgiving to help us all get back on track!  This is a super gentle 3 day cleanse designed to:
* Burn fat
* Eliminate cravings
* Refresh, revitalize and restore all of your organs
* Increase metabolism
* Drop that post Thanksgiving bloat! 


I follow the strength in numbers philosophy so I'm looking to put a group together of people who want to do it with me.  This way we can all support each other and offer tips! 

I'm thinking I want to start Dec 1st.  Start December off on the right foot!  Who wants to join me?

Email me at heatherchristine312@gmail.com to be put on this list! 

Friday, November 14, 2014

Warm Balsamic Brussels Salad

As I have shared with you guys, I have been going on a clean eating food journey.  I love to cook, however, I will also go through periods when I am just uninspired and I don't feel like cooking.  Recently I was going through one of those periods and I decided to challenge myself to get out of my funk!
I decided I would try 1-2 new recipes per week, and share them on my blog.  I have to say, this is exactly what I needed!!  I have been re-inspired and making some really delicious meals! 
It's also been a little challenging for me because I cook mostly by taste and preferences and not so much by recipes (unless I'm baking).  So I'm trying to be conscious of amounts and what not but my advice to you is experiment in the kitchen and play with your food :)

Get ready because this one is an AWESOME one!  I will definitely be making this one again. 

Not only do I love my food to taste amazing but I have a thing for it looking pretty too.  Call me weird but there is just something about a beautifully vibrant plate of food.

This recipe is not only delicious but it's stunning on a plate as well.  It would be a great addition to any festive table.  It certainly doesn't have to be a special occasion though - I made this on a quiet night at home with a girl friend.  Definitely nothing fancy!

Warm Balsamic Brussels Salad

Here's what you will need for this recipe ...

* Brussels sprouts
* Walnuts (app 1/2 cup roughly chopped)
* Garlic (to preference)
* Dried cherries or cranberries( app 1/4 cup)
* Pomegranate seeds (app 1/3 - 1/4 cup)
* Feta cheese (sprinkle on top to liking)
* Coconut oil ( just over 1 Tbs)
* Balsamic (1/2 cup)
* Honey (1 Tbs)
* 1/4 lime and zest
* Seasoning (my go to is pink salt, ground pepper, garlic granules and toasted onion granules)

You should first understand that I can't make Brussels sprouts and not make Brussels chips.  You are going to peel off the outer layer anyway, so why not make a yummy appetizer out of them!?

*Pre heat oven to app 375 degrees.
* First cut the bottoms off the Brussels and discard them.
* Put all the petals into a bowl and add a light amount of EVO and seasoning (I used pink salt, ground pepper and garlic granules) and toss with your hand, making sure everything is evenly coated.
* Take out baking sheet and place parchment paper down.  Put Brussels on the tray and bake for about 10 mins to start.  The petals will be different sizes so you may have to take some of the smaller ones off earlier.  Gauge your cooking time appropriately.


* The key is to only slightly brown them.  There is a fine line and once you've crossed it, the chip will turn bitter.  It's better to be under than over.

Once completed, put out as an appetizer for your guests to enjoy while you work on the salad.


Instructions for the salad:

* First chop the Brussels into quarter (halves if they are smaller) and place into a bowl.
*  I melted app 2 tsp of coconut oil and put that over the Brussels and tossed them in it.  I then seasoned them with pink salt, ground pepper, garlic granules and toasted onion granules.
* Heated my large sauté pan to med heat and added a little coconut oil to coat the bottom of my pan and added the Brussels.  Stir somewhat frequently.  You want a nice brown to them.
* While that was going I heated my smaller sauté pan to med and added the walnuts.  I drizzled with a little bit of EVO and seasoned with a dash of toasted onion granules.  You'll only need about 5-7 minutes to toast these.  Just remove them from the heat when you're done. 
* I am a huge garlic fan so this is optional.  I did a rough chop to 5 garlic cloves and added them to the Brussels about 1/2 way through.  You could also chop the garlic if you didn't want chunks. 


~While this was finishing I made the dressing:

*1/2 cup of Balsamic vinegar
* 1 Tbs honey
* Juice from a lime wedge and some lime zest
* Chopped clove of garlic
* Pink salt, ground pepper, garlic granules, toasted onion granules

* Get a big bowl and add the Brussels, toasted walnuts, dried cherries and pomegranate seeds.
* Pour over the dressing and toss the salad until it's coated.
* Serve with feta on top.


Enjoy!